

Git Stash:
Purpose: Git stash serves as a tool to temporarily store changes made in your working directory without committing them to the version history.
Usage:
When you're working on a specific task in a branch but need to switch to another branch for a quick fix or another task, you can use
git stashto save your changes temporarily.After stashing, your changes are removed from the working directory, allowing you to switch branches without committing incomplete work.
Commands:
git stash: This command saves your current changes into a "stash", essentially a stack where changes can be temporarily stored.git stash list: Displays a list of all stashes, enabling you to see which changes are stored and access them when needed.git stash drop: Deletes a specific stash.git stash clear: Removes all stashed changes, clearing the stash stack.
Cherry-pick:
Purpose: Git cherry-pick empowers you to select specific commits from one branch and apply them to another branch.
Usage:
Imagine you've made some commits on one branch that you want to incorporate into another branch without merging the entire branch. Cherry-picking allows you to do this.
You specify the commit(s) you want to apply by using the
git cherry-pick <commit_hash>command.
Resolving Conflicts:
Cause: Conflicts arise when Git encounters differences between the changes made in different branches that are being merged or rebased.
Indicators:
git status: This command provides a summary of the current status of the working directory, including information about files with conflicts.git diff: Shows the differences between conflicting versions of files, highlighting areas of conflict.
Resolution:
Conflicts need to be resolved manually by comparing the conflicting versions and making necessary adjustments to reconcile the differences.
Once conflicts are resolved, the files need to be staged using
git addbefore completing the merge or rebase operation.
Task-01:

Before starting Task-01, make sure you have cloned the repository using
git clone <repo-name>and that you are in the correct directory where the repository is located.
Create a New Branch and Make Changes:
git checkout -b new_branch_name
Make desired changes to files in this branch.
Save Changes with Git Stash:
git stashThis saves the changes made in the new branch without committing them.
Switch to a Different Branch and Make Changes:
git checkout different_branch_nameMake necessary changes to files in this branch and commit them using:
git commit -m "Commit message"Apply Stashed Changes to the Different Branch:
git stash popThis brings back the changes saved earlier with
git stashand applies them on top of the new commits made in the different branch.
Task-02:
Switch to the Development Branch: Before making changes, ensure you are in the development branch (
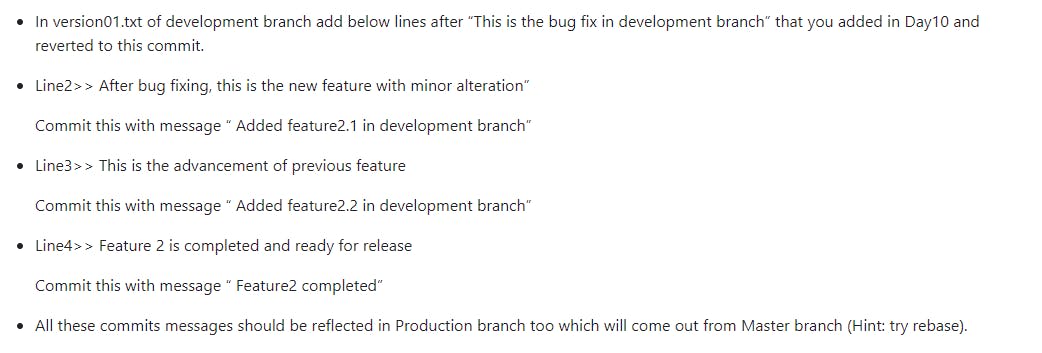
devbranch):git checkout devEdit version01.txt: Open the
version01.txtfile in your preferred text editor.Add the Lines: Add the specified lines after "This is the bug fix in development branch" within the
version01.txtfile:Line2>> After bug fixing, this is the new feature with minor alteration Line3>> This is the advancement of previous feature Line4>> Feature 2 is completed and ready for releaseCommit the Changes: Stage the changes to
version01.txt:git add version01.txtCommit the changes with a descriptive message:
git commit -m "Added feature2.1, feature2.2, and completed feature2 in development branch"
Ensure Commit Messages Reflect in the Production Branch:
- Switch to the production branch:
git checkout main
Use rebase to incorporate commits from the master branch, including the ones from the development branch:
git rebase main
Task-03:

Cherry-pick Commit from Development Branch to Production Branch:
Identify the commit hash of "Added feature2.2 in development branch".
Switch to the production branch:
git checkout production_branchCherry-pick the specific commit:
git cherry-pick <commit_hash>
Add Additional Lines and Optimize the Feature:
Open the file affected by the cherry-picked commit in the production branch.
Add the specified lines after "This is the advancement of previous feature".
Add "Added few more changes to make it more optimized" after line 4.
Stage the changes and commit them with the message "Optimized the feature":
    git add version01.txt
    git commit -m "Optimized the feature"
Push the Changes to GitHub: Once you have committed the changes in the production branch, push them to GitHub:
git push origin main
Conclusion:
Well done on finishing Day 11 of the #90DaysOfDevOps journey! Today, we delved into some advanced Git tricks like stashing, cherry-picking, and rebasing. These methods help us handle changes and work together smoothly in Git projects.
If you enjoyed what you read, please consider following and giving it a thumbs up 👍 to show your support 😄
Thanks for taking the time to read! 💚